
How to schedule a message in Microsoft Teams

In 2021 I wrote an article [1] about the importance of scheduling your work emails and positive impact that this action has in your productivity and in the wellbeing of your email recipients. At that time I wished it was possible to schedule messages on Microsoft Teams as well, since I often choose to work at unusual hours and I do not want to disturb anyone that has push notifications enabled. I even used to write my Teams messages anytime but waited until 08:00 the next morning before clicking Send.

Fortunately, after a long wait [2] it is finally possible to schedule messages in Microsoft Teams, although you need to enable this option first and it is not that easy to find. Here is how you do it.

1) Open Microsoft Teams in the desktop app or in the browser. Click on Apps.

2) Click on Workflows.


3) Find an app called Schedule a message and click on it.

4) Click on Sign In.

5) Click on Sign In and then on Add Workflow.

6) The workflow will be added. Click on Done. Let's try it out!

7) Open a Teams chat or a channel. In the compose box click on the three dots.

8) Find an app called Workflow. If you cannot find it, it means that your organization might have it disabled by default. In that case you need to ask your IT admin to activate the app [3].

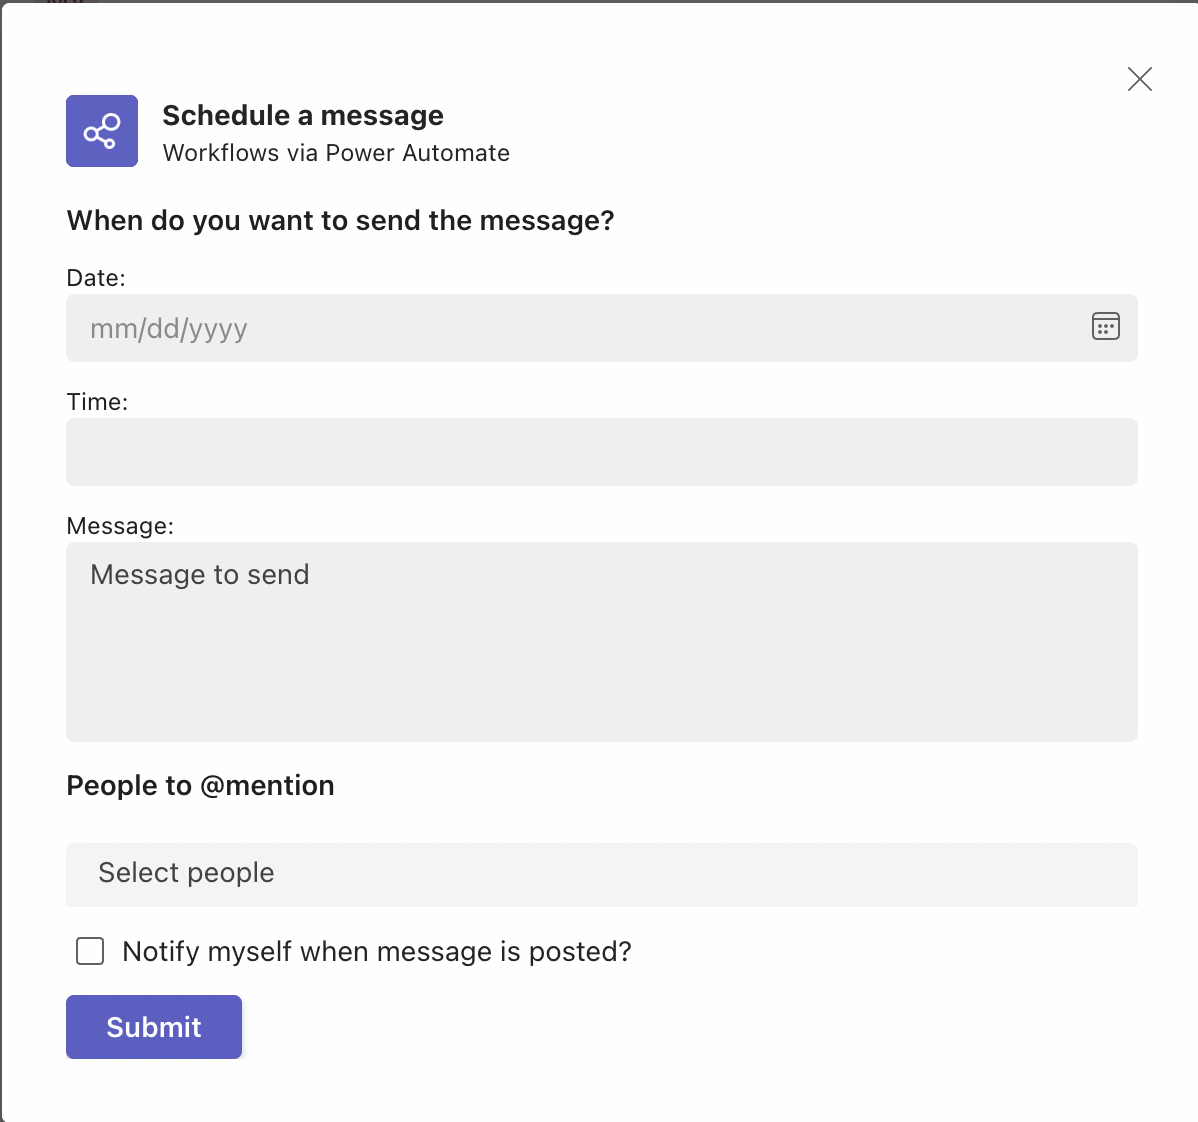
9) Type the message details and click on Submit. You won't see any confirmation yet but the message will be sent at the scheduled date and time.


You might also want to go back to step 3) and install two useful apps: Schedule a reply and Schedule a meeting from a message.

Popular posts from this blog

How to disable cookies on Google Analytics so that you don't need a consent banner

The integration of Google Analytics into a website or blog is not GDPR-compliant by default . You must first obtain explicit consent of the end-users to store cookies, describing in your privacy policy how you intend to use collected personal data. This is the reason why most websites nowadays display an annoying (but necessary) consent banner. If you fail to do so or if you only ask for implicit consent, you are at risk of being fined. However, it is possible to disable cookies on Google Analytics (GA) respecting end-users privacy, so that you don't need to ask for consent. The downside is that you will not be able to distinguish the type of user (unique vs new vs returning) and you will miss some session insights. If these details are not relevant for you, here is how you do it. Disable Google Analytics cookies on a custom website If you have a custom website with full access to the source code, you can simply insert the script below between the <head>  and </head>...

How to convert a PWA into an Android app in 5 minutes

In early 2021 I developed a memory game called Kobadoo  as a PWA (Progressive Web App) using ReactJS. It works pretty well as a browser game and gets decent traffic, but I wanted to reach more potential users by making it available on the official mobile app marketplaces. Since I didn't want to spend any time coding a native app, the easiest solution I found was to convert the PWA into a TWA (Trusted Web Activities) app. It barely takes 5 minutes to do it. TWA essentially allows you to easily create an Android app ( .apk file) that displays a full-screen browser view of your PWA. The user experience is almost identical to a web app and the views from the TWA will count as traffic on your web app. This means that if you have ads on your PWA, they will still work (and generate revenue) from the TWA. Another advantage is that every update you make on the PWA will be immediately reflected on the TWA without the need to submit a new version on Google Play. Here's how I convert...

How to change a post thumbnail in Blogger

If you have ever published a post on Blogger with more than one image on it, you might know that the featured image  (also called post thumbnail ) that is displayed in your blog's landing page is always the first image in the post. Blogger does not provide an editor tool to change this thumbnail. However, there is a workaround that will enable you to set the image you want. Find the Image URL. You can do this by right-clicking on an image of your choice from your browser and selecting Copy image address . Note that it can be any image that is publicly available on the Internet, not only from your post. Changing your post HTML code. From Blogger editor tool, click on the pencil, then select HTML view . Add the following line at the very start of your HTML code: <img src=" https://www.example.com/image.png " style="display:none;"/> where the URL in red is the one you copied in step 1. Click on Publish . That's it! The chosen image will be displayed as ...